Showing posts with label Di Ford Mystery quilt. Show all posts

Tuesday, January 12, 2016

Miss Porter and a Mountmellick update

As I said in my last post, my word for the year is Focus. Already I can feel myself wavering, but a quick look at my list and I decided that a new start at the beginning of a new year was in order. One of my favorite quilting books is Primarily Quilts by Di Ford. I just love her attention to detail and working on one of her quilt designs pushes me both technically and in fabric selection and that is what I was searching for in this new start. That and the fact that I wanted to work in a certain color palette that suits my need for calm after the busyness of the holidays. While many of my quilts are made for the process only, I really do like displaying them in my home. I felt I was needing/wanting a quilt that would fit into my main living space during the winter when I like to use a more monochromatic color scheme. Here is my winter blooms hanging in the space.

As you can see the space is very open and as I love all shades of teal and aqua those are the only permanent colors in the space. I love changing out the pillows and quilts by season to change the feel of the room and was looking to make something to hang over the couch which sits opposite the TV and my Winter Blooms quilt. The Miss Porter quilt is one from my list and I had been collecting the fabrics for awhile.

I began with the feathered star block and just let me say that while I have been working on improving my piecing, something went wrong. I will save the specifics for another post as I am happy to say I was able to salvage my mistake and here is the block without the shark tooth border. I had fun picking the motifs for the broderie perse in the center. The original had flowers but I wasn't happy with my selection of flowers as I really wanted to bring a bit of teal into the block. My finished block before the addition of the shark tooth border.

Here is the block on the couch with the border ready for applique - I am loving how pretty this looks in the room.

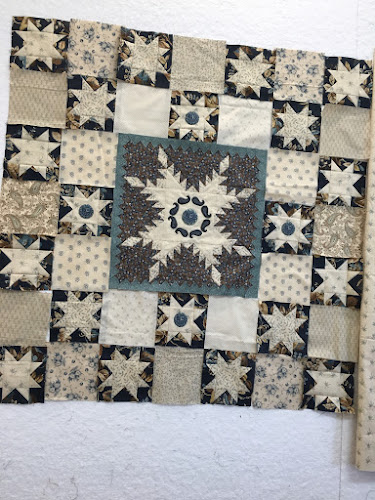
Next up were the 5" star blocks and while making these I decided that it was time to double check my seam allowance as they were ending up just a tiny bit too big. I could trim the finished blocks but I really prefer to adjust my needle position and see if that helps. Sure enough by moving it just one potosion to the left my block size improved and I had discovered one of the problems in the creation of my feathered star. So here is where I am right now on the design wall. The feathered star shark tooth border is awaiting applique and then this can be sewn together.

At the same time I am working on this leader ender project made with 1 1/2" cut squares of my bright scraps. My sewing machine is having issues picking up the first few stitches of a seam so having a leader ender project on the go is a must. I am getting ready to turn these blocks into something useful soon!

And finally a quick peek at the continuing hand quilting on Mountmellick, Quiltmania magazine's 2014 mystery by Di Ford. I have not done much hand quilting in the last few years and I am enjoying this so much. It is fun selecting a new quilting pattern for each round and I love the dimension achieved with this wool batting. I really hate marking a quilt so I do as much free hand as possible. However, this round I am marking as I go by simply tracing around a plastic template that I made to fit the space and it seems to be working out well.

Time to get back to stitching!


Saturday, October 3, 2015

Some quilting, some embroidery and some blue and white

Another road trip is behind me and I am finally back to some fun stitching. This was a trip to check in on DH's aging parents and all I can say is that I am so happy that I have my sewing to keep me going during these times! This trip I worked on this little embroidery, Welcome Home by Kathy Schmitz. The original embroidery was done in all black but I decided to add touches of teal to go with the border fabric. I ended up hand quilting it and think it is sweet on this little stand.

I have also been working on the hand quilting of Mountmellick, the Quiltmania mystery quilt by Di Ford. I ended up doing an echo quilting for the background fill. I was originally planning a crosshatch but decided I didn't feel like marking. Hmm, now to decide how to do the first border.

And I have completed a few more of the blocks for the Antique Wedding Sampler by Di Ford. Here is Block 17.

And Block 19. I was thrilled to be able to find a place to use this Asian toile, I love the pagoda style building. I think those little butterflies need to antennas added.

Today I finished the last machine pieced block in the quilt, Block 23. Unfortunately there were a few errors in the directions for this block. Two of the templates were marked with the wrong dimensions and the layout diagram was incorrect for one of the HST units. Fortunately I figured out the measurement issues as I was figuring out the rotary cutting measurements but sadly did not notice the incorrect HST unit until I showed it to DH who noticed right away that the block looked weird. Oh well, all fixed now.


Wednesday, September 16, 2015

Mountmellick is a finished top

Whew, back from our trip to Oklahoma to move our son and The Texas to visit family. All went well and I have spent the last several days trying to get back into the routine of things and trying to get motivated in the sewing room. Though I was feeling the urge to start on something new, I resisted and put on the borders for Mountmellick, the mystery quilt by Di Ford that was in last year's Quiltmania magazine. I am so glad I did as I love how it turned out.

Part of what took so long is that I couldn't use as much of the strip as I wanted as there were not enought full repeats of the pattern to cut it the way I needed. So after much deliberation and advice from quilting buddies, I ended up just using the darker portion of the stripe. Turns out that was the perfect solution, but in future I guess I better check the stripe repeat before getting my heart set on how I want to use it.

Next up, the hand quilting. I am trying a wool batting for the first time and my LQS only had Quilter's Dream Wool in the size I needed. Seems a bit puffy so far but hopefully once I add the fill around the appliqe I will like it better. Still deciding between echo quilting or grid work as the fill. I like the look of grids but hate the marking and stitching. I love doing echo quilting though so it may win out once again!

 
I did get this month's Quiltmaker bitty blocks done. These finish at 4" and were a fun way to get back to my machine and use up more of my scraps. This will end up as a cute row quilt at the end of the year and hopefully I will see a dent in that scrap basket by then!

Finally, you may remember a quilt, Science Fair, that I finished quilting a few months ago. It was draped across the bed in the room that our son was expected to live in at the end of the summer. However he was only here for a few nights before moving to his permanent job and I had forgotten to remove it from the bed when he arrived. He saw it in the room and said how much he liked it. The next day he sheepishly hinted that he would like to have it to hang in the office/sewing room in his new apartment and I was thrilled to gift it to him. After all, isn't that the best purpose for our quilts, to surround people with our love. I was delighted to get this picture of the quilt hanging in his room, haha, a constant reminder of mom!


Thursday, July 16, 2015

Di ford mystery quilt, part 6 continues

This has been a busy stitching week and yesterday I finally had a chance to cut the setting triangles for my Di Ford Mystery, Mountmellick. In the original quilt the final border is red so I have really had to think about color placement while selecting colors since I changed my border to a teal fabric. I am really learning a lot about color, design and attention to details with this quilt. Di seems to excel at these things and in trying to select fabrics to enhance her design I am paying more attention myself. Today I pieced 2 of the borders, can't wait to get to the other 2 soon. It turned out a little darker than I intended but I do really like it. And isn't it weird how light the center background looks - it is the same fabric used in the background for the stars in the final border yet looks so much lighter!

One of the things that has kept me busy has been helping my DIL finish a quilt for her brother's wedding. She finished sewing the top before the wedding but didn't have time to get it quilted so this week she came over to make the backing. We decided to add a pieced section to make the quilt reversible and to save fabric.

I rarely make quilts this big, it is 87 x 91", so I was a bit nervous to quilt it. I ended up doing a simple all over paisley design and think it worked out well. Now to get it trimmed and the binding put on. Thankfully, DIL will be doing the hand stitching on the binding on this one.

Really happy to have this quilt off my plate, I am anxious to start quilting some UFOs of my own.


Thursday, July 9, 2015

Di Ford Mystery, Part 6 begins

For the last several months I have been enjoying my Di Ford Mystery, Mountmellick, quilt top displayed over my fireplace. Although I would much prefer to hang a finished top, sometimes seeing the unfinished one eventually spurs me on to a finish as is the case with this one.

If you are familiar with this quilt, which was last year's mystery quilt in Quiltmania magazine, you know that part 6 has lots of EPP to do before the border can be assembled. Just over a week ago I decided to tackle the EPP only to discover that I did not have the correct paper pieces for the 36 stars. So instead I began with the corners and ordered the "jewel" pieces from Paper Pieces. Here are the finished corners.

And once the papers arrived I began making stars. I decided to do a little fussy cutting with these stars and am pretty pleased with how they are looking.

Once the stars are made they need to be appliqued to the background. I like to remove the papers before appliquing so I give the star a quick spray with Best Press, iron on both sides and then remove the papers. A tiny dab of Roxanne's Glue Baste and they are glued in place on the background square. While I do sometimes use a glue stick to baste my EPP I find that it is easier to thread baste these tiny pieces in the corners only. By not basting throughout the paper and punching a hole in the papers before using they are easy to pop out.

I like to finger press the diagonal lines on the square to help with placement for these. By making sure that the tip points are going in the direction of my stitching (I am left handed) these are easy to appliqué in place. I do trim the tips as I come to them so there won't be so much extra fabric to tuck under.

And here is the quilt on the design wall with some of the finished stars in place. I am waiting til all the stars are complete before cutting all the setting triangles as I am still deciding on fabrics for those. And on the right is the border I am planning to use. I wish I had used a darker teal fabric for the center swags but I love the border enough to make it work.

I did finish piecing my Red and White quilt, a little late for the July 4th and Canada Day holiday but hopefully it will be quilted before Christmas.

Finally another little Stonefields sunflower block. I couldn't resist making one more!


Tuesday, November 25, 2014

Di Ford mystery Part 5

I finally caught up with the Di Ford mystery quilt in Quiltmania. Part 5 is now complete and now I must wait for the arrival of the next issue at my LQS. So happy to be caught up with this as the Bonnie Hunter mystery Grand a Illusion starts on Friday!

I am still working away on Stonefields but since I am loving it so much, I am trying not to rush it so I can enjoy the process. Here is the last block sewn from Part 2.

And a few more hexagons. I am really trying to use up some fabric that I had precut for hexagons from another project while injecting some of the newer Stonefields fabric for continuity. Slowly I hope to be able to add more fussy cutting too. 43 done, about 130 to go!


Sunday, November 16, 2014

Trying to catch up

With my excitement over Stonefields and a few other projects, I have fallen behind on my Di Ford mystery quilt. I suddenly realized that the next issue of Quiltmania will be arriving at my LQS any day and I made a start on part 4. After working on Stonefields these colors seem so dark and muddy but I am enjoying the variety.

I have also been working on finishing up my Quilt Doodles BOM. I made several changes to the design. Here is a bit of a preview of the work in progress.

The snowflakes, snowmen and little deer are thanks to my son who cut them on his die cutter and shipped them to me. They are wool felt and after fusing I ended up doing the stitching by hand, a little too detailed to machine appliqué as I had planned. But it was worth the effort. I will share the finished top soon, it is just a bit too large to get a good photo!


Tuesday, August 19, 2014

Di Ford Mystery Part 3

I have finally finished part 3 of Quiltmania Magazine's Di Ford designed mystery. Though I started this project with great gusto back in Feb., this part really stalled me. Not really sure why but I think it has something to do with the colors I selected for the project. They just seem a little muddy to me and as a result I don't love the project as much as I did when I started. I was trying to recreate the look that is in so many of Di's quilts which is a bit darker than I usually work and I am finding it is just not me or perhaps it is just the time of year as I do prefer working in brights during the summer months. But I will keep working on this one as I do like it overall and will try to add a little lightness in the next round. Who knows once winter arrives I may think it is perfect.

Now I need to start pulling fabrics for the next part!


Wednesday, June 11, 2014

The mysteries continue

I am all caught up with the Austen Family Album and can now relax with just one block per week. I really like the addition of the lighter fabrics and am enjoying each of these blocks. This week I finished 2 more. The first is called London roads and I was excited to find a suitable road fabric in my stash for the center. I am not thrilled with the second block but am at least pleased to be able to use more sampler fabric.

And I finally decided to get started on Part 3 of the Di Ford Mystery quilt in Quiltmania magazine. This part is made up of an appliqued border that includes regular appliqued leaves, broderie perse flowers and some EPP hexagon flowers. Since I am using my own fabric selections, rather than buying a kit, I have had to make a few changes in the broderie perse as I do not have as many different flowers to choose from. As a result all my borders will be the same and I am pleased with this layout.

Ready to get stitching!


Thursday, April 3, 2014

Border issues

I am so excited that I have this border finished! It was certainly a challenge for me to get it to fit and I am still puzzled as to what went wrong.

Since I know there are others out there working on the Di Ford Mystery in Quiltmania magazine, I am going to explain my issue in the hopes of figuring it out. First, the pattern for the templates was not included in the magazine but quickly Quiltmania realized their mistake and made the pattern available for download on their website. I printed a copy and double checked to make sure they were accurate.

Using the magazine measurements I cut all the triangles with no problem. The problem for me seemed to come from the measurement of the squares. The pattern suggested drawing a grid of 2" squares and then appliquéing the circles before cutting the individual squares. After reading that there were a few people having size issues on the FB group I decided to piece the border before doing the appliqué. In the template diagram the square measurement is 1 3/8 meaning a cut size of 1 7/8, not the 2 " mentioned for drawing the grid. I was confused but Di Ford herself clarified on the FB group that the cut size was to be 1 7/8 so that is what I cut.

But I sewed my border and ended up almost 1" short of the 24 1/2 measurement that is should have been. I was frustrated but decided to spray it with Best Press and stretch it slightly while ironing to see if I could fix it some. While that is not a great fix it did work and I decided to sew the next border. This time I moved the needle over one position and change to Aurifil thread to see if things would improve. They did not so I finished my borders using my "fix" with Best Press to make them fit. But I was so frustrated as I was sewing so carefully and had double and triple checked my cutting and seam allowance measurements.

I then decided to measure the square template realizing that the diagonal need to be 2". Yes, that was perfect.

So finally I measured the square and what did I find but that it was just over 1 3/8" by almost 1/16". Unfortunately due to the angle of the photo this is not quite clear.

Ok that does not seem like much but for me it did seem to make a difference or probably it really is fine and it is just my stitching or perhaps my pressing. Those piecing by hand using the templates seem to have no fit issues and Di and others seem to have no issues piecing by machine with the 1 7/8 measurement, so I am stumped as to why it would not work for me. I would love to hear from anyone else who can explain it or to hear how it worked for you if you are making this quilt. This has been a year that I am trying to improve my piecing so any suggestions would be appreciated!