Saturday, May 30, 2015

A Quilty Fun finish and a Quilty Fun Christmas start

It has been a busy week but I have had a little time to play in my new space. I finished the borders on my Quilty Fun row quilt. I had to actually purchase fabric for the borders, hard to believe I had nothing in my stash!

I decided to also make the scrappy binding as suggested in the pattern while I still had all the fabrics out. I think it is going to be the perfect finish though it was very time consuming. I guess that is why I have never done a scrappy binding before!

I even made this Bee Block to use as the label. Lori Holt often designs a cute block to use as a label and I think that is such a fun idea. I still need to add the embroidery and borders to finish it off.

And while I was still feeling the Quilty Fun, I decided to start my version of Quilty Fun Christmas. This was a free pattern that Lori Holt did on Instagram last year during the Christmas season. It uses many of the blocks from Quilty Fun and a few new blocks in a Christmas theme. Unfortunately I did not join in last year so finding all the instructions on Instagram is a little tricky but if you go to her Instagram profile page and scroll down far enough they are still there. Lori's blog Bee in My Bonnet is full of fun ideas and she is currently working with her new book "Farm Girl Vintage" but I have not yet jumped on that bandwagon. Anyway here are a few of my Christmas blocks. I had several fat quarters from a Riley Blake Christmas line from a few years ago so that was my jumping off point. The "red" is actually a dark orange, a unique color for Christmas but I am liking it.

A log cabin, tree and cup of cocoa. It was such fun discovering I had the perfect fabric for the house "logs" and tile roof.

Some mittens and an adorable gingerbread man. Yay, I had the perfect buttons and ric rac in my stash and doesn't that pink mitten fabric just look like knitting.

Let's add a peppermint stick and some Christmas lights. I had to cut that stripe on the bias to make it work.

A star, tree ornament, a candle and some pinwheels (happily made from some bonus triangles from a previous project).

A gift and a cute snowman. The snowman was actually the label block but I had to put it on the front, just too cute.

Just a few more blocks and some embroidery to go. I plan on just finishing this as a small wall hanging and then will make a larger simple quilt to be used as the matching bed quilt. All of these quilts will be for my granddaughter, I am just having so much fun sewing for a little girl at last!


Friday, May 22, 2015

The move in continues and more Quilty Fun

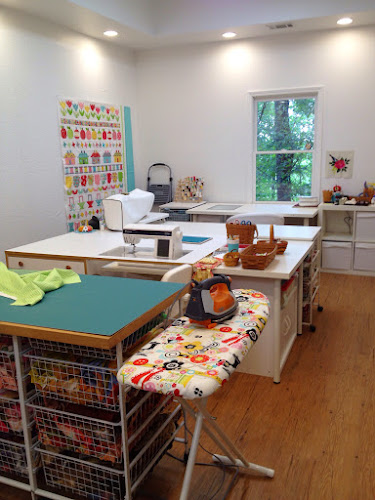
After putting up the design wall on Sunday the move into the new studio space has begun. Though there are still a few things yet to be squeezed in, I am super happy with how well things are fitting. I did lots of measuring furniture and playing with floor plan arrangements on paper before we began in, though I must admit that there needed to be a few adjustments to the plan as I saw things in the room. That huge space sure shrank quickly. So, here is a little tour of my new studio space while it is still clean and tidy. First up is the fabric storage and longarm area. The wire drawer units are from IKEA. I have used these for a few years now and just love them. I sort most of this fabric by color but some of the drawers are filled with projects that are ready to go. The top is a MDF board cut to size at Home Depot. Since I am only 5'2" I decided that I would only go 2 high so that I could use the shelf for my Lonaberger baskets which hod mostly small accessories or fabric scraps. On the other side of the longarm are the IKEA cube shelves. I store my wools, silks and some projects here but they really need to be reorganized now that I have everything in one room. Behind those are stacking plastic drawers each filled with fabrics pulled for a project. These were used when I moved to China several years ago as I needed to make sure that I had everything I would need for a particular project with me. I would like to replace these with more of the IKEA cubes in the future. You can also see my cutting table in front of the longarm frame. This was made many years ago using wire basket frames from Home Depot, long before IKEA stores were here. It is sporting a new top obtained from the IKEA "as is" area and in the background you can see the old top against the wall. That is going to be covered to use as an ironing table and will be set up right behind the cutting table.

In this picture you can see a better view of the cutting table in relation to my sewing machine. After many different room configurations in the last few years, I have discovered that I love having the cutting table right behind my sewing machine. Those wire baskets hold rulers and cutting accessories in the top baskets and mostly hand dyed fabrics in the lower baskets. And that little ironing board gets pulled up to my sewing table when I am sewing so that it is right next to me and is at the right height for me to press while sitting. It was purchased in China and was the biggest one I could find. The best thing about it now it is it's small size and that I can adjust it quite low. I covered it in a fun fabric several months ago and I love it. Next to the cutting table are the shelving units I mentioned in my last post. Those laundry baskets hold fabrics including most of my brights and the cloth boxes are mostly UFO's. Seeing all my fabric in one space after over 8 years of separation is almost frightening. I really need to get busy!

Looking from the other side of the cutting table you can see my table space. My main machine is in a Horn sewing cabinet that I have had for almost 20 years - love it. I do not like sewing with a table pushed up against a wall so this is in the middle of the room. I have IKEA tables and rolling shelves arranged into a large table space so I can spread out. There is a walkway between the main table space and the table in front of the window. That table is my appliqué prep area and of course you can see the new completed design wall on the left. The second machine that is set up and covered is the machine that I have been using for FMQ while my longarm has been in pieces. The longarm still needs to be fully set up so it is good to keep this machine available.

Finally from this angle you can see the right side of the appliqué prep area which includes my copy machine and light table. Another cube shelving unit with more projects and under several table areas are rolling drawers for pens, fabric paints, free motion quilting accessories and paper. A filing cabinet under the light table hold patterns and books are stored in book shelves in the adjoining sitting room.

My Quilty Fun quilt is awaiting borders and is hanging on the design wall.

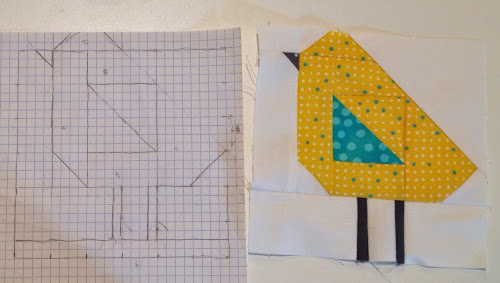
The original quilt pattern included mittens in the bottom row but I decided to draft a bird pattern to use instead. I was inspired by a few bird blocks including the chick block that Lori Holt included in her new book "Farm Girl Vintage" and came up with this little bird. I think it works well in the quilt and was a fun easy block.

Thanks for joining my on my studio tour, hopefully I will be back to more sewing soon.


Sunday, May 17, 2015

Design wall tutorial and my new space

It has been just over a year since we moved into this house and my DH has been working hard to finish our lower level which will include my new sewing space. Logistics and budget meant that the area is being finished in stages and at last the sewing room and adjacent sitting room are complete. Since our youngest son is here for a few weeks before starting a summer job in Virginia we hope to take advantage of an extra helper to make the move down 2 flights of stairs so we have been tackling the final details before the grunt work can begin. First, DH set up the table/frame for my longarm and it is now in position on one end of the room. The machine is still not there but that will hopefully be installed soon. You can also see some open shelving on the right wall. This was a weird niche in the wall of the room so he just drywalled into the niche and added some IKEA shelving units that we had. The center shelves had to be customized to fit the space but I love all that storage. The laundry baskets do have some fabric in them, some quilting cottons, some home dec fabric and finished tops etc. I have not really organized the area yet as this was extra stuff that I never moved into my upstairs room. The table is not permanent, it is just being used to help me get an idea of placement but is probably where my cutting table and ironing station will end up.

Here is a shot of the opposite end of the room showing the blank wall that is just awaiting the design wall installation. It is a large wall 11 1/2' across and 9' high under the soffit. One of the things we love about this house is the super high basement ceilings. It was great doing this ourselves because I was able to add lots of lighting including 24 can lights!

After doing a bunch of research on design walls, both on the Internet and talking to my quilting friends, I decided to mount batting covered foam core insulation boards to the wall. I used fairly thin inexpensive boards (I think they are 1/2" or 3/4" thick and cost about $15/board). I will be using 3 boards total and one board needs to be cut down a few inches to make it fit the space. Originally I had planned to use flannel to cover the boards and looked into purchasing extra wide flannel. But after speaking to other quilters I ended up using Warm and White cotton batting instead. It seems to hold the fabric to the design wall a bit better, comes by the yard at 90" wide and was on sale for 1/2 price at JoAnn's. Perfect.

So here is how we tackled each panel. First we rolled out the batting and laid the insulation board on it so I could cut the batting to size. I cut it about 4" bigger on all 4 sides and then cut out the corners as you can see in the photo. We then tipped the board up on it's side so I could lightly spray the batting with spray basting glue and then leaned the board back on the batting. This step may not be necessary but I thought it might keep the batting from shifting and it did seem to work well. Then with DH's help we wrapped the batting around the edges and taped them with duct tape. One note of caution. The other side of the board is silver and a friend had trouble getting the duct tape to stick to the silver side so make sure to place the silver side down.

In order to attach the panel to the wall we used industrial strength adhesive backed Velcro purchased at Home Depot. We cut 9 strips each one 6" long and put 3 along each end and in the middle. Making sure to keep both sides of the Velcro together we took the backing off one side only, we used the softer side, and pressed them in place on the board. Then we removed the adhesive backing from the hook side of the Velcro which was still in place on the board. The adhesive backing is still covered in the photo. By keeping both sides of the Velcro on the board you don't have to worry about how to make sure it is in the right place on the wall. This is probably obvious to you but it wasn't to me until DH explained it - I was thinking we had to measure the wall to make sure we put the opposite side of the Velcro in the right place. I felt pretty stupid when I caught on.

Finally the whole panel was lifted and pressed in place on the wall. The instructions for the Velcro say that the adhesive takes 24 hours to fully cure but it was sticking great immediately. Certainly you could screw the panels in place, which would be cheaper, but I really wanted the clean look of an invisible installation. Plus I figure if it ever needs to come down to replace the batting it should be pretty easy to remove. Two panels in place and I am thrilled with how it is turning out.

After over 20 years of a piece of using a 72" square piece of design wall batting thumbtacked into a wall this huge new design wall is a dream come true. One more panel to go and the moving can begin!


Thursday, May 7, 2015

Another Rachel Meyer block and a few more finishes

For those of you that have been following my progress on my version of Rachel Meyer's quilt and wondering if I had given up, fear not, I have finally finished another block. I think this puts me at 8 of the 12 outside blocks complete. Slow going but at least it is progress. I do love this Pomegranate block with its fun little butterflies and the stylized pomegranates. I think this may be my favorite block so far.

Last weekend I travelled out of town for my son's graduation and have had several busy days since but I was able to make a few more rows for my Quilty Fun quilt. I am still enjoying this project but while sewing the rows together my machine started making funny noises. If you are like me you know exactly how your machine should sound and weird noises coming from the motor area certainly got my attention so my favorite machine is now in the shop for service. Thank goodness I have a spare machine as there is a 3 week wait!

So today I finally had a free day to be spent in my studio. The first part of the day was setting up my spare machine and fiddling with it to get my 1/4" perfectly set. Even though I have a 1/4" foot I still need to adjust the needle position in order to get the scant 1/4" that I prefer to piece with and since I rarely use this machine I am never sure where the needle should be. I tested it by piecing the border for this little wall hanging "Singing in the Rain" by Fig Tree Designs. I got the whole thing done before I realized that my seam allowance still needed some tweaking. The afternoon was spent quilting and binding and it finally hangs in a little upstairs bathroom.

I also made this little pillow from the wool appliqué block that I worked on while my SIL was visiting. It seems a bit misshapen so I must have made it a bit too small for the pillow form. Oh well, it still works and I will be more careful next time. What a relaxing day and so nice to get a few little finishes.


Friday, May 1, 2015

Quilty Fun

Lately I have really felt the need for some fun, easy sewing in happy colors. Is it the change of seasons, all the life stuff happening or something else? Who knows but my new project certainly fits the bill. My SIL have decided to both make our own version of Quilty Fun by Lori Holt. This was a popular Quilt Along a few years ago that was turned into a book. I decided to use colors and fabrics much like the original quilt because they are both happy and I had them in my stash already pulled for another project that never got started. Well, most of them. Seems I am quite short on bright reds as I seem to use more orange in my bright quilts so a quick trip to my LQS and I came home with a couple of pieces of red to add to the stash. Good job I went when I did as the next day the air conditioning in my upstairs sewing room failed and we discovered that the whole unit needs to be replaced and now I am on a no fabric buying diet for several months! After a few sewing sessions here is where I am so far. First up, four patches and butterflies.

Next, the chubby chevrons and apples.

And here are the flying geese and coffee cups.

And finally all of them together. It is just so fun pulling these bright happy fabrics together. The color combination is a bit of a change for me and I am liking the red much more than I expected.

So sorry about the picture quality. It is difficult taking photos in my cramped sewing space. My design wall is filled with a special project that my DIL is working on for her brother's wedding. With 2 small children and limited space at her house the project has moved here. We are working marathon late night sewing sessions getting it put together. She sews while I run the bits back and forth from the design wall and keep everything organized. It is looking good and last night we passed the 1/2 way mark.

The lower level studio is ready for the big move to begin but first I need to make and install a large design wall and DH needs to set up the longarm. I am looking forward to finally being set up in one place but oh how I dread another move, even if it is only down 2 flights of stairs!